> For the complete documentation index, see [llms.txt](https://magecomp.gitbook.io/shopify/llms.txt). Markdown versions of documentation pages are available by appending `.md` to page URLs; this page is available as [Markdown](https://magecomp.gitbook.io/shopify/apps/magecomp-mobile-app-builder/mobile-app-builder.md).
# Mobile App Builder
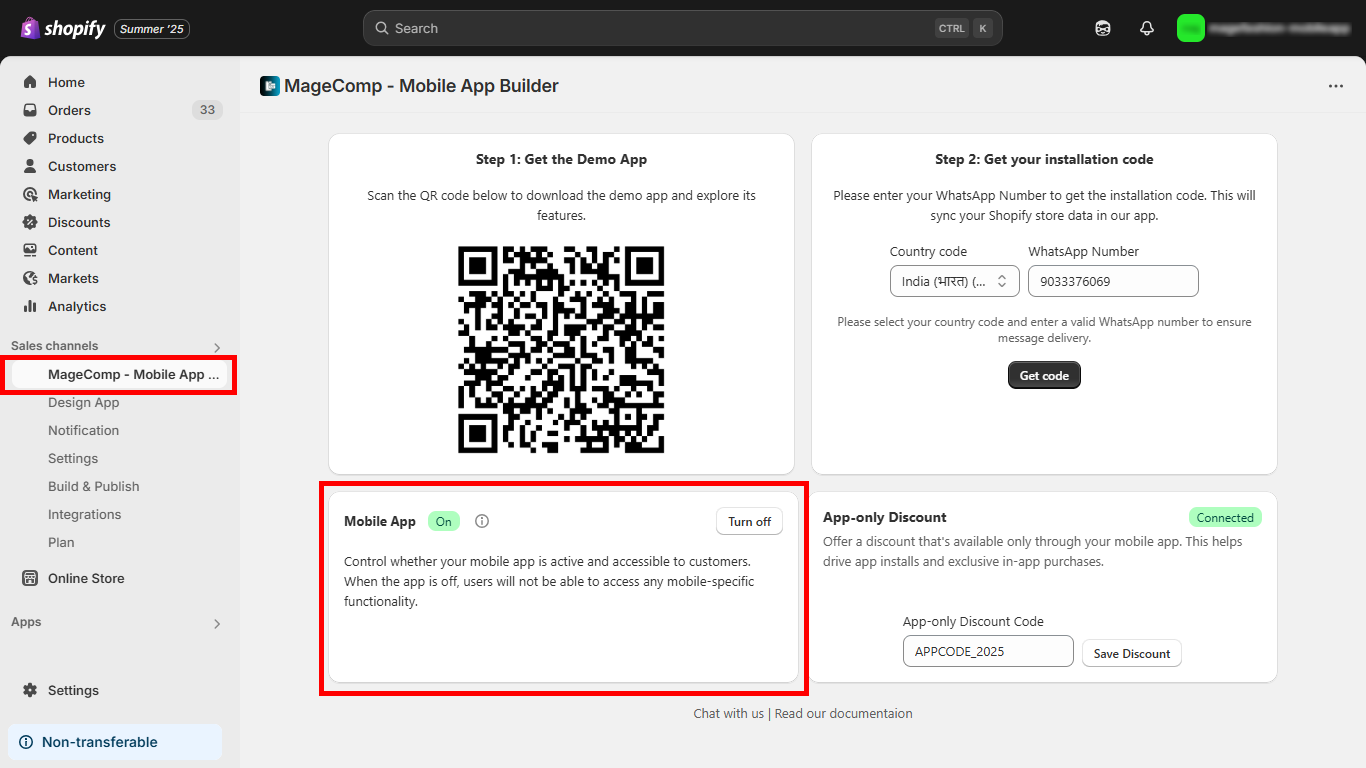
This is the first page after you install the mobile app builder for your store.
### Setup guide
Use this guide to get your mobile app up and running.
#### 1. Install Templates
Install the mobile app templates on your store to enable app integration and ensure proper functionality.
#### 2. Customize Theme
Customize the app design to match your brand by adjusting colors, banners, fonts, and layout from the backend.
#### 3. Scan & Get Store Code in WhatsApp
To preview your mobile app, follow these steps:
1. **Scan the QR Code**\
Scan the QR code displayed in the dashboard to download the demo app on your device.
Once you scan the QR code, the **Download Your App** screen will appear. This screen allows you to choose the app version based on the plan you have selected.
#### . Choose the plan according to your app type
You will see two options:
**Starter Plan – Embedded App**
If you want an **Embedded App**, click **Starter**.
The Embedded App connects directly with your existing Shopify store and displays your store inside the mobile app with minimal customization.
**Choose Starter if you want:**
* Your existing store to sync with the app.
* A quick and simple app setup.
* Your website/store experience inside the app.
* No custom app build or advanced customization.
**Price:** $19/month
**Native Plan – Native App**
If you want a **Native App**, click **Native**.
The Native App is a fully branded mobile application built specifically for your store, providing a more customized and app-focused experience.
**Choose Native if you want:**
* A fully branded mobile app.
* Customization of the app's design and layout.
* A more advanced mobile shopping experience.
* Publishing on the **Google Play Store and Apple App Store**.
* Additional customization and integrations.
**Price:** $29/month
After selecting the appropriate option, download the app from **Google Play** or the **App Store**.
#### Follow the Setup Steps
Once the app is installed, open it and follow the on-screen setup process.
**Step 1: Connect Your Shopify Store**
Tap **Connect Store** to authorize the MageComp App Builder to access your Shopify store.
**Step 2: Enter Your App Code**
On the **Enter Your App Code** screen, you need to enter the 6-digit preview code.
2. **Enter Your WhatsApp Number**\
In the backend, enter your active WhatsApp number where you can receive messages.
3. **Receive Verification Code**\
You will receive a one-time verification code on your WhatsApp number.
4. **Verify in Demo App**\
Open the demo app and enter the received code to securely connect your store.
Once the code is successfully verified, you will be able to **preview your app**.
{% hint style="info" %}
**Note:** If you don't have an app code, you can select **Skip With Demo App** to view a demo app instead.
{% endhint %}
**Step 3: Choose Your App Template**
Select the template you want to use for your app and tap **Next**.
**Step 4: Access Your App**
Once the setup is completed, you will see the **You're All Set!** screen. Tap **Go To Dashboard** to continue customizing and managing your app.
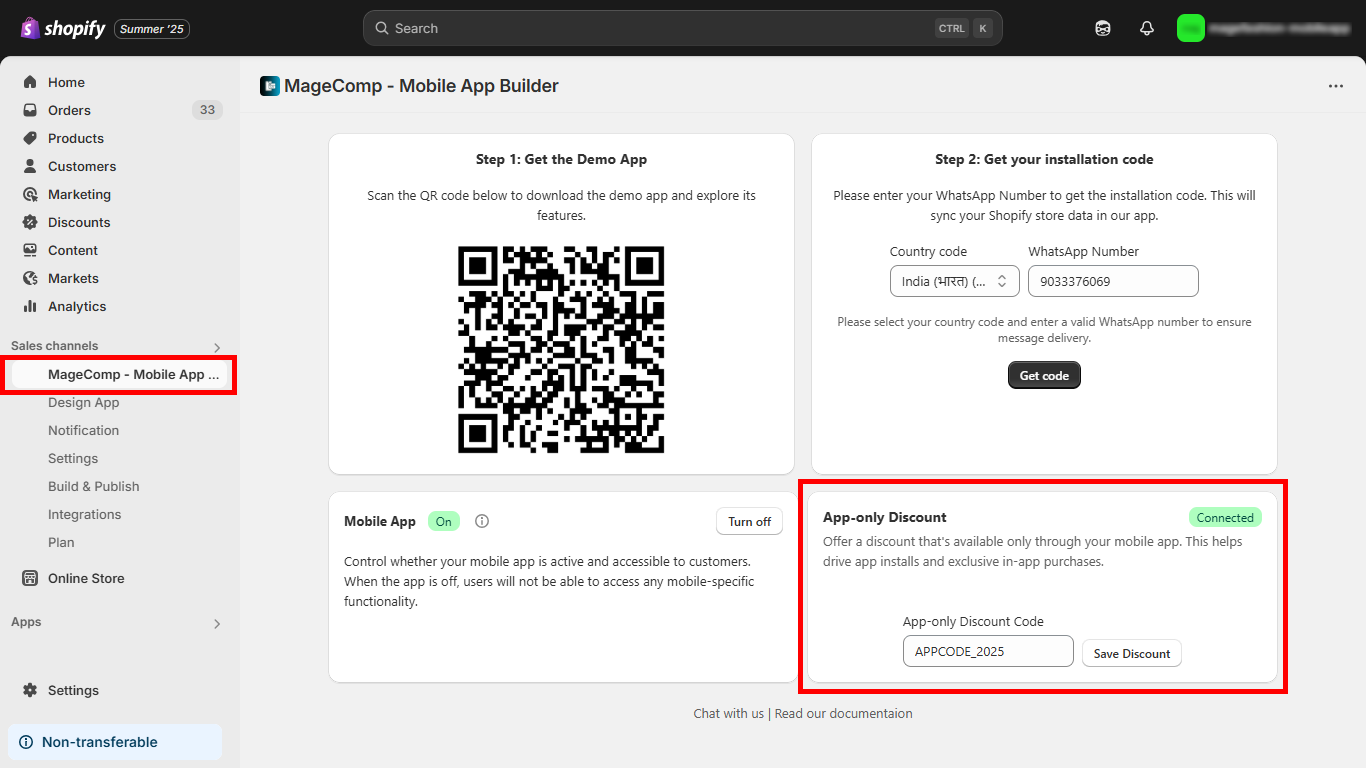
The last step is to add the in-app discount code. This is a discount that will be available for your customers whenever they make their first purchase from your app.
You can also enable or disable the app status.
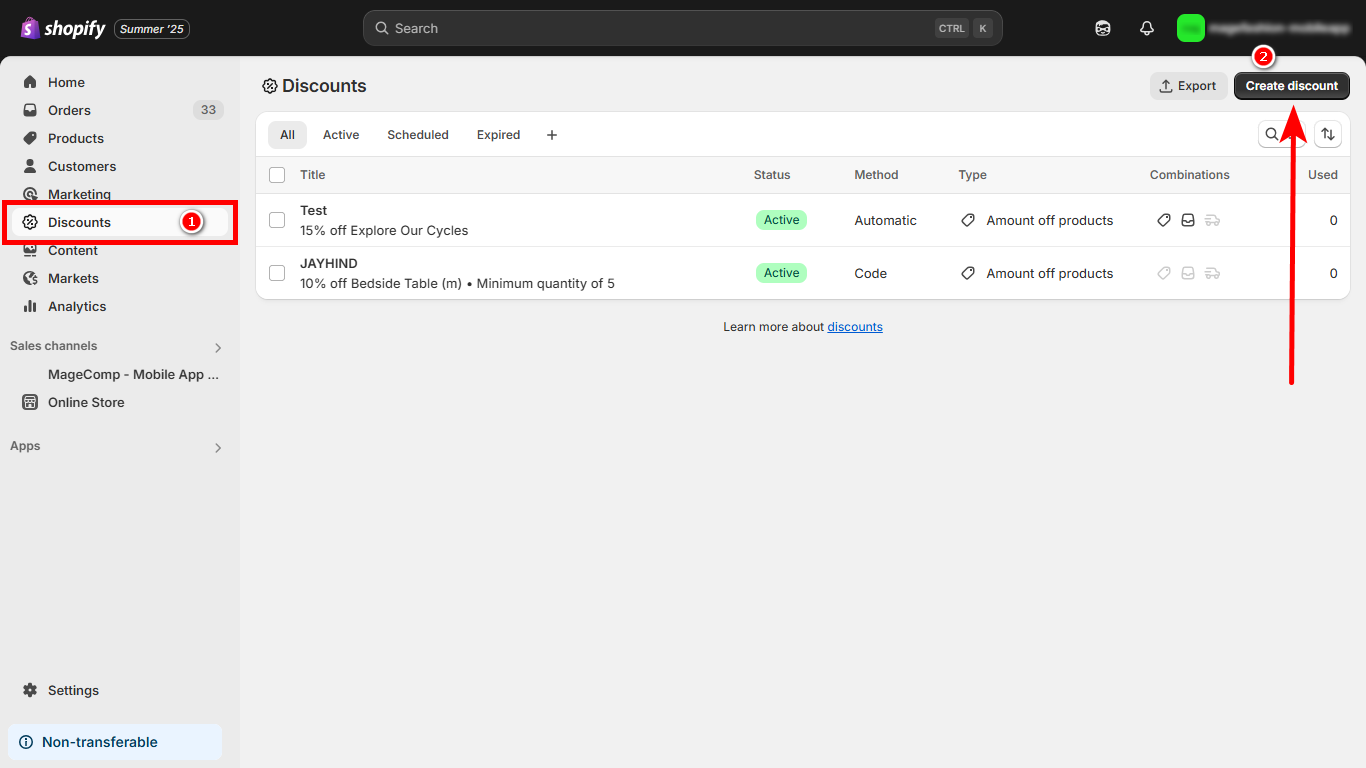
To add the discount code in this field, you need first to create a discount code.
**Step #1**
For that, you need to go to **Discounts** in your stores' admin panel.
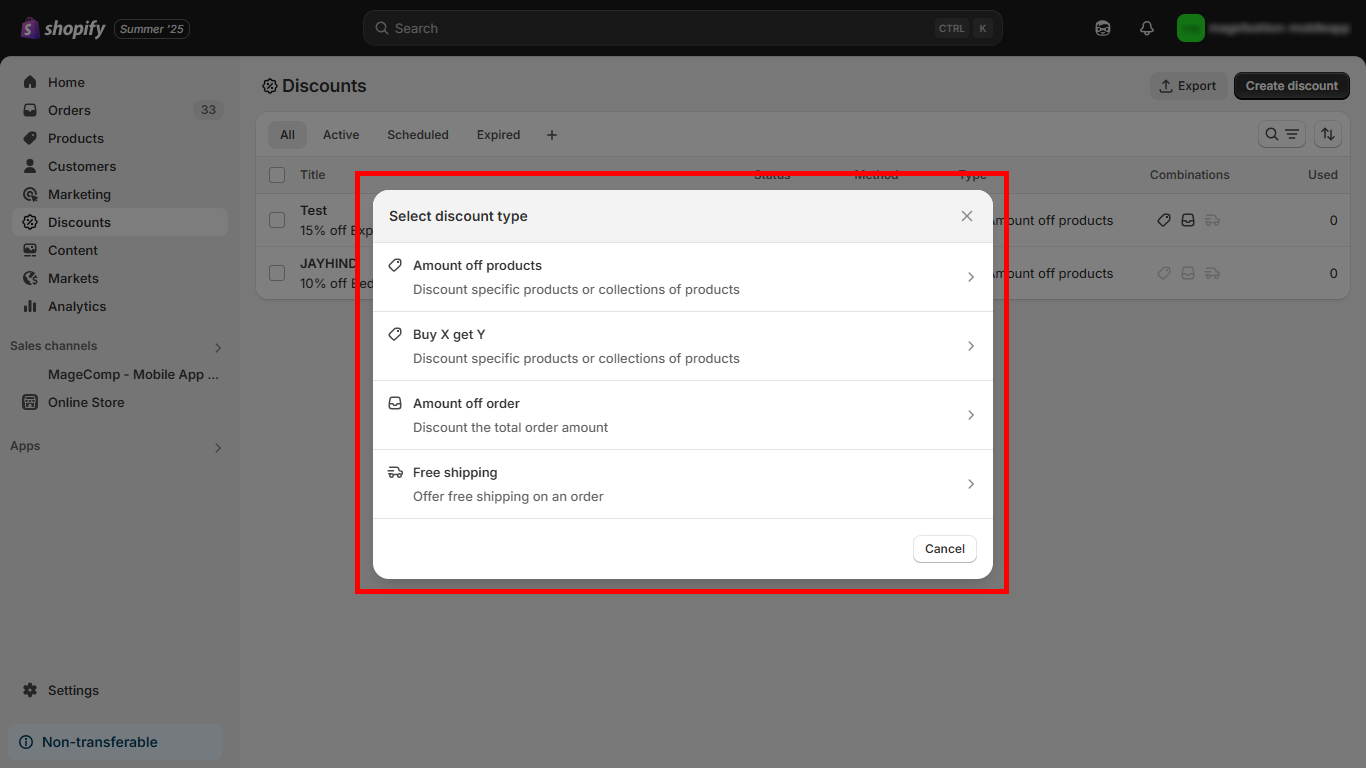
**Step #2**
Select the type of discount you want to create for your in-app discount.
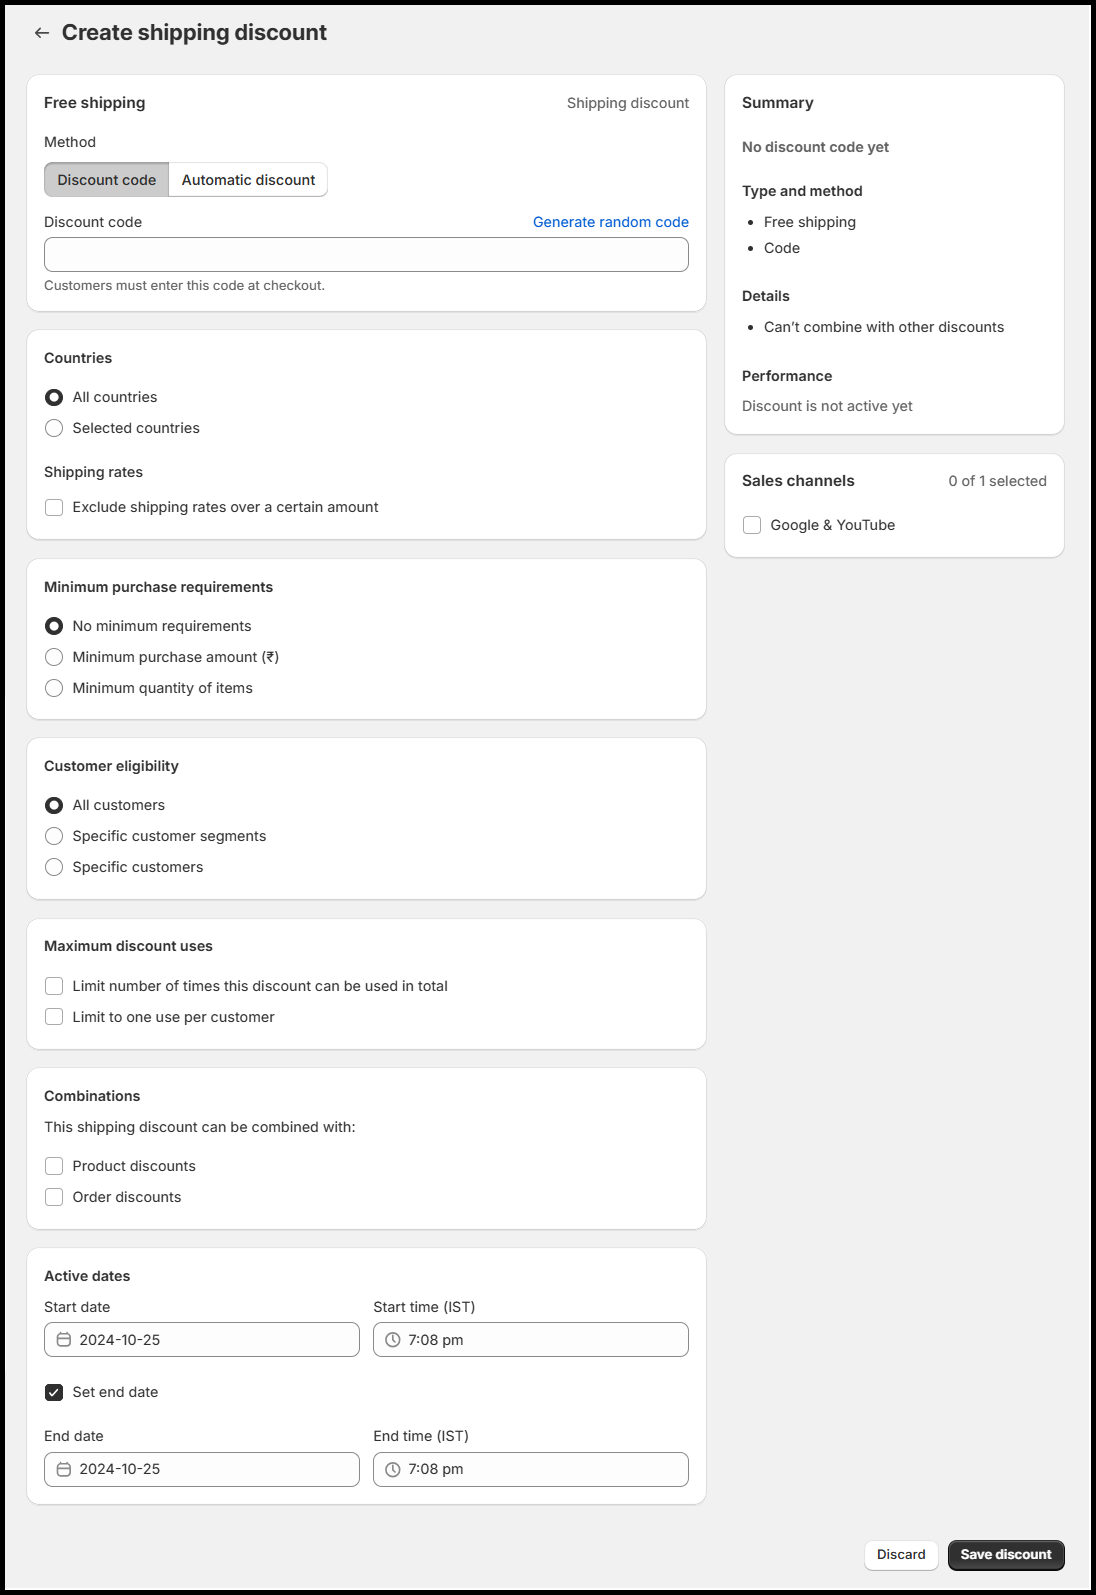
Suppose you have selected **Free Shipping.** After that, you need to configure the following settings.
* **Method -** Select the method of your discount.
* **Discount Code -** Enter your discount code. (you can choose to generate also.)
* **Countries -** Select the countries to which you want to enable this discount.
* **Minimum purchase requirements -** Select your desired option if you want to/don't want to set a minimum purchase limit to avail of the discount.
* **Customer eligibility -** Select to which customer groups you want to avail of this discount.
* **Maximum discount uses -** Select your desired option if you want to/don't want to limit the use of the discount.
* **Combinations -** Select either of the options if you want to allow your customers to combine their discounts.
* **Active dates -** Set the start and end date and time of the discount according to your requirements.
**Save the discount** after you have configured all these settings.
Once you have saved the discount, copy that discount code and navigate to the mobile app builder's backend again, paste the discount code in the in-app discount code field, and save your changes.
Now this discount will be available for the customers who place their orders from your mobile app.